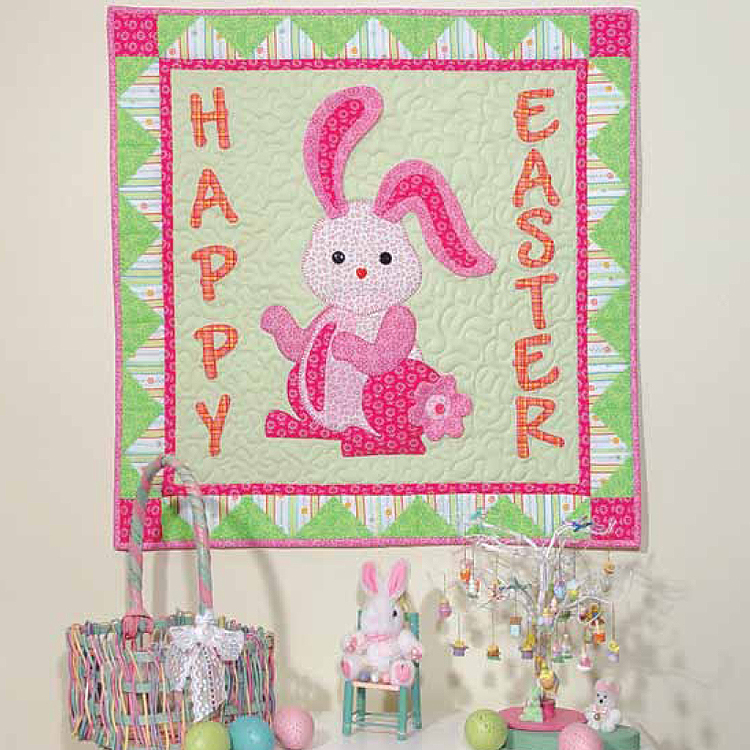
National Craft Month has us hopping for joy! Here's an absolutely adorable Easter Bunny quilt project from our friends at
Hancock Fabrics!
Easter Bunny Quilt
Finished Size:
Approximately 24” square
What You'll Need:
June Tailor® Ink Jet Printable Freezer Paper
June Tailor® Amazing Alphabet Freezer Paper
June Tailor® Perfect Half-Square and Quarter-Square Triangles Ruler
Fusible Web
Light pink fabric for applique bunny and binding
Medium pink fabric for applique bunny
Dark pink fabric for applique bunny, inner border and outer border setting squares
Print fabric for letter appliques
2/3 yd. light green fabric for quilt center
1/4 yd. green fabric for outer border
1/4 yd. stripe fabric for outer border
2/3 yd. backing fabric
Batting
Coordinating thread
Cutting:
Light pink fabric cut 2-1/2" strips to create 3 yards of binding
Dark pink fabric cut (2) 1" x 19-1/2" strips and (2) 1" x 21" strips for inner border, (4) 2-1/2" outer border setting squares
Light green fabric cut (1) 19-1/2" square for quilt center
Green fabric and stripe fabric cut (20) 3" squares from each fabric
Directions:
Applique
For letters, apply fusible web to the wrong side of fabric, following the manufacturer's instructions. Cut letters from June Tailor® Amazing Alphabets Freezer Paper. Iron letters to the right side of fabric. Cut letters from fabric and remove freezer paper and fusible web backing paper.
Print bunny pattern pieces onto June Tailor® Ink Jet Printable Freezer Paper following the manufacturer's instructions. Do not mirror image. Download pattern pieces at http://hkfstores.com/content/freeprojects/BunnyQuilt.pdf
Apply fusible web to the fabric backs for the legs, arms, body, head, inner ears and inner tail. Iron freezer paper pattern pieces to the right side of fabric. Cut pieces from fabric and remove freezer paper and fusible web backing paper.
For belly, ears and tail: Layer two pieces of fabric, right sides together. Place on top of a layer of batting and pin. Cut freezer paper pattern 1/4" larger around entire pattern and iron onto top wrong side of fabric. Sew through all layers using a 1/4" seam allowance. Remove freezer paper and trim close to stitching. Carefully separate the two layers of fabric and cut a slit down the center of the top layer of fabric only. Turn appliques right side out and press edges. Fuse inner ear and inner tail appliques to ears and tail.
Position fusible bunny and letter applique pieces, as shown, on quilt center and fuse according to manufacturer's instructions. Pin ears, belly and tail in place.
Finishing:
Sew 19-1/2" inner border strips to top and bottom of quilt center. Sew 21" inner border strips to sides of quilt center.
Layer green fabric and stripe fabric squares right sides together. Follow the manufacturer's instructions on the June Tailor Perfect Half-Square and Quarter-Square Triangles Ruler, to create (40) 2-1/2" half-square triangle blocks. When using stripe fabrics, make sure to alternate the direction of the fabric to match pattern pictured.
Join (10) half-square triangle blocks, as pictured, to form an outer border unit. Repeat for a total of (4) units.
Sew pieced border units to top and bottom of inner border.
To (2) remaining pieced border units, sew a 2-1/2" dark pink setting square to each end. Sew to sides of inner border.
Layer quilt top, batting and backing. Quilt around fused appliques using straight, satin or buttonhole stitch. For ears and tail, quilt only around the center fused portions to attach pieces. For belly, stitch close to applique edges. Quilt green quilt center using a meandering stitch. Stitch in the ditch for borders and bind.

1 Comments
You need to
login to comment.
-
Lornet
•
11 years 326 days ago
This turned out fittasnac! It makes me want to start quilting again! I have way too many hobbies..lol.I really love how your made the quilting below the plant look like roots. The bright blue reminds me of a clear summer day. Great job!