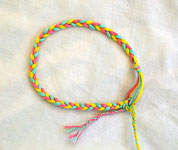
It's day 12 of the
30 Days of Creativity, and according to the calendar today's inspiring item is "string." This instantly conjured up a summertime memory of making friendship bracelets. Here is a simple tutorial from
Kaboose on how to make this classic craft. You can use embroidery floss, leftover yarn strands, or bits of string.
Braided Friendship Bracelet
from Kaboose
What You'll Need
2- 24” strands of embroidery floss, yarn or string, color A
2- 24” strands of embroidery floss, yarn or string, color B
2- 24” strands of embroidery floss, yarn or string, color C
Scissors
Directions
Line up each strand on your work surface in matching pairs. Make sure they are all the same length.
Hold all the strands together, then fold them in half. Tie a knot at the center, creating a loop.
Separate the strands into three sections: pink, yellow and light blue.
Tape the knotted end to the table or hang it with a thumbtack in a bulletin board. This will hold the string taut for you as you braid.
Braid the three strands. Keep going until you have a braid that will fit around your wrist.
At the end of the braid, combine the strands to make two strands instead of three and tie into a knot to end the braid.
Now separate the strands again into two separate groups. Braid each group, leaving enough room at the end to tie a knot. Knot both mini braids and trim off the excess strands to make them even and neat.
Wrap the bracelet around your wrist and ask a friend to tie the small braids to the loop at the end.

You need to
login to comment.